In this tutorial, we will learn how to work with Excel files in R statistical programming environment. It will provide an overview of how to use R to load .xlsx files and write spreadsheets to Excel.
In the first section, we will go through, with examples, how to use R to read an Excel file. More specifically, we are going to learn how to;
- read specific columns from a spreadsheet,
- import multiple spreadsheets and combine them to one dataframe,
- read many Excel files,
- import Excel datasets using RStudio
Furthermore, in the last part, we will focus on how to export dataframes to Excel files. More specifically, we are going to learn how to write;
- Excel files, rename the sheet
- to multiple sheets,
- multiple dataframes to a Excel file
Table of Contents
- How to Install R Packages
- How to Read Excel Files to R Dataframes
- Reading Multiple Excel Sheets in R
- Reading Many Excel Files in R
How to Install R Packages
Now, before we continue with this Excel in R tutorial, we will learn how to install the needed packages. This post will use tidyverses readxl and the xlsx package to read xlsx files to dataframes.
Note that we are mainly using xlsx in this post because readxl cannot write Excel files, only import them into R.
# Install tidyverse
install.packages("tidyverse")

# or just readxl
install.packages("readxl")

# how to install xlsx
install.packages("xlsx")Code language: R (r)
Now, Tidyverse comes with a lot of useful packages. For example, using the package dplyr (part of Tidyverse) you can remove duplicates in R, and rename a column in R’s dataframe. A
How to install RStudio
In the final example, we will read xlsx files in R using the interactive development environment RStudio. Now, RStudio is quite easy to install. In this post, we will cover two methods for installing RStudio.
Here are two steps for installing RStudio:
- Download RStudio here
- Click on the installation file and follow the instructions
Now, there is another option to get both R statistical programming environment and the great general-purpose language of Python. That is, to install the Anaconda Python distribution.
Note that RStudio is a great Integrated Development Environment for data visualization and analysis using R. RStudio is mainly for R, but we can also use other programming languages ( e.g., Python). That is, we typically don’t use RStudio only for importing xlsx files.
How to Read Excel Files to R Dataframes
Can R read xlsx files? In this section, we will find out that the answer is “yes”. We will learn how to load Excel files using Tidyverse (e.g., readxl).
In this section, we will learn how to read Excel files and spreadsheets to dataframes in R. In the read Excel examples, we will read xlsx files from both the hard drive and URLs.
How to Import an Excel file in R using read_excel
First, we will load the r-package(s) we need. How do I load a package in R? It can be done using the library or require functions. In the following code chunk, we will load readxl to use the read_excel function to read Excel files into R dataframes.
require(readxl)Code language: R (r)If we look at the documentation for the function read_excel, which we are going to use in this tutorial, we can see that it takes a range of arguments.

Now it is time to learn how to use read_excel to read data from an Excel file. The easiest way to use this method is to pass the file name as a character. If we don’t pass any other parameters, such as sheet name, it will read the first sheet in the index. In the first example, we are not going to use any parameters:
df <- read_excel("example_sheets2.xlsx")
head(df)Code language: R (r)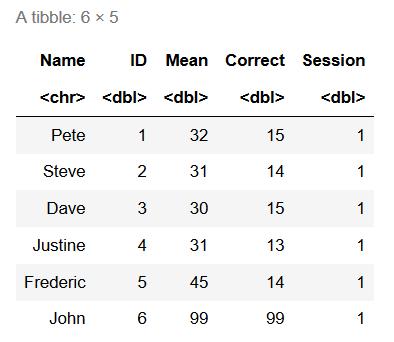
Here, the read_excel function reads the data from the Excel file into a tibble object. If we want to, we can change this tibble to a dataframe.
df <- as.data.frame(df)Code language: R (r)Now, after importing the data from the Excel file, you can continue with data manipulation if needed. It is, for instance, possible to remove a column, by name and index, with the R-package dplyr. Furthermore, if you installed tidyverse, you will have a lot of tools that enable you to do descriptive statistics in R and create scatter plots with ggplot2.
Importing an Excel File to R in Two Easy Steps:
Time needed: 1 minute
Here’s a quick answer to the question how do I import Excel data into R?? Importing an Excel file into an R dataframe only requires two steps, given that we know the path, or URL, to the Excel file:
- Load the readxl package
First, you type library(readxl) in e.g. your R-script

- Import the XLSX file
Second, you can use read_excel function to load the .xlsx (or .xls) file

We now know how to load an Excel file in R easily and can continue with learning more about the read_excel function.
Reading Specific Columns using read_excel
In this section, we will learn how to read specific columns from an Excel file using R. Note that we will also use the read.xlsx function from the package xlsx.
- How to use %in% in R: 7 Example Uses of the Operator
- Learn How to Transpose a Dataframe or Matrix in R with the t() Function
Loading Specific Columns using read_excel in R
In this section, we will learn how to read certain columns from an Excel sheet using R. Reading only some columns from an Excel sheet may be good if we, for instance, have large xlsx files and don’t want to read all the columns in the Excel file. When using readxl and the read_excel function, we will use the range parameter together with cell_cols.
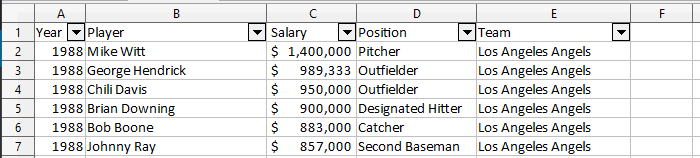
When using read.xlsx, to import Excel in R, we can use the parameter colIndex to select specific columns from the sheet. For example, if we want to create a dataframe with the columns Player, Salary, and Position, we can accomplish this by adding 1, 3, and 4 in a vector:
require(xlsx)
cols <-  c(1, 2, 3)

df <- read.xlsx('MLBPlayerSalaries.xlsx',
                   sheetName='MLBPlayerSalaries', colIndex=cols)
head(df)Code language: R (r)
Handling Missing Data when we Import Excel File(s) in R
If someone has coded the data and used some value to represent missing values in our dataset, we need to tell R and the read_excel function what these values are. In the following R read Excel example, we will use the na parameter of the read_excel function. Here, “-99” is what is coded as missing values.
Read Excel Example with Missing Data
In the example below, we are using the parameter na, and we are putting in a character (i.e., “-99”):
df <- read_excel('SimData/example_sheets2.xlsx', 'Session2',
           na = '-99')

head(df, 6)Code language: R (r)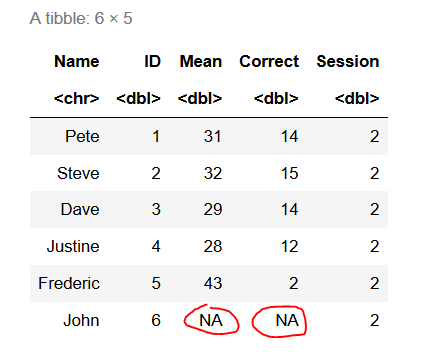
The example datasets we have used in the tutorial on using R to read Excel files can be found here and here.
How to Skip Rows when Importing an xlsx File in R
In this section, we will learn how to skip rows when loading an Excel file into R. Here’s a link to the example xlsx file.
In the following read xlsx in R examples, we are going to use both read_excel and read.xlsx to read a specific sheet. Furthermore, we are also going to skip the first two rows in the Excel file.
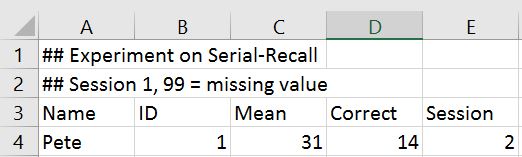
Skip Rows using read_excel
Here, we will use the parameter sheet and put the characters ‘Session1’ to read the sheet named ‘Session1’. In a previous example, we just added the character ‘Session2’ to read that sheet.
Note that the first sheet will be read if we do not use the sheet_name parameter. In this example, the important part is the parameter skiprow=2. We use this to skip the first two rows:
df <- read_excel('SimData/example_sheets.xlsx',
                 sheet='Session1', skip = 2)

head(df, 4)Code language: R (r)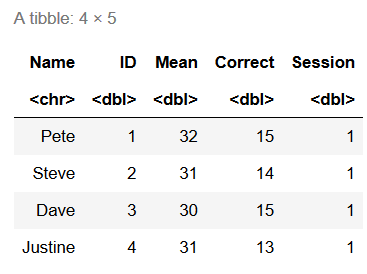
How to Skip Rows when Reading Excel Files in R using read.xlsx
When working with read.xlsx we use the startRow parameter to skip the first 2 rows in the Excel sheet.
df <- read.xlsx('SimData/example_sheets.xlsx',
                   sheetName='Session1', startRow=3)Code language: HTML, XML (xml)
Reading Multiple Excel Sheets in R
In this section of the R read excel tutorial, we will learn how to read multiple sheets into R dataframes.
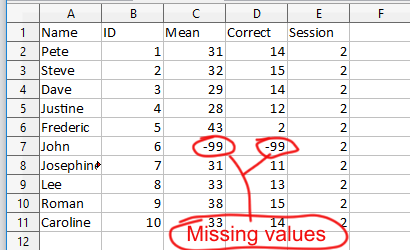
The example xlsx file (example_sheets2.xlsx) has two sheets, ‘Session1’ and ‘Session2’. Each sheet contains data from two experimental sessions.
We are now learning how to read multiple sheets using readxl. More specifically, we will read the sheets ‘Session1’ and ‘Session2’. First, we are going to use the function excel_sheets to print the sheet names:
xlsx_data <- "SimData/example_sheets.xlsx"

excel_sheets(path = xlsx_data)Code language: R (r)
If we want to read all the existing sheets in an Excel document, we create a variable called sheet_names.
After we have created this variable, we use the lapply function and loop through the list of sheets, use the read_excel function, and end up with the list of dataframes (excel_sheets):
sheet_names <- excel_sheets(path = xlsx_data)

excel_sheets <- lapply(sheet_names , function(x) read_excel(path = xlsx_data, sheet = x))

str(excel_sheets)Code language: R (r)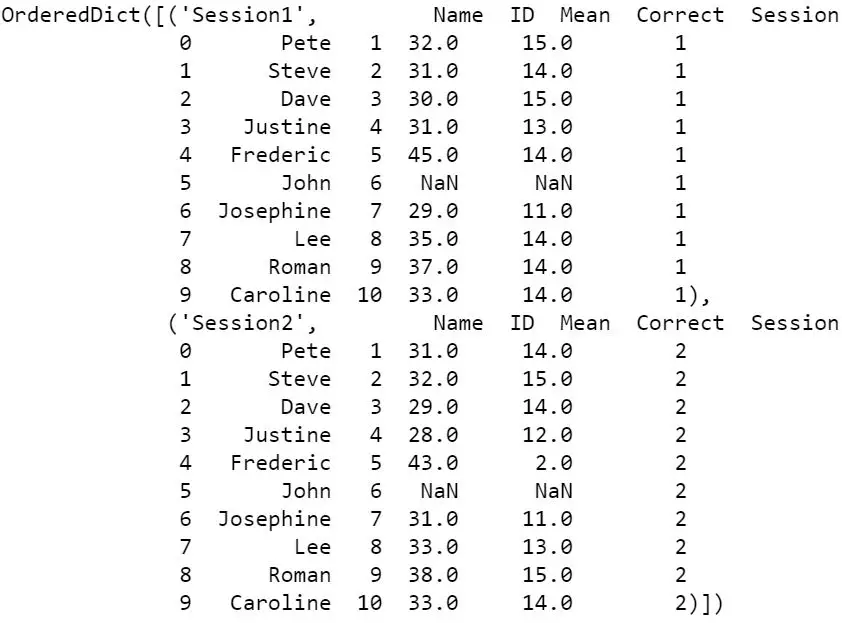
When working with Pandas read_excel w may want to join the data from all sheets (in this case sessions). Merging Pandas dataframes is pretty easy. We use the concat function and loop over the keys (i.e., sheets):
df <- do.call("rbind", excel_sheets)

head(df)Code language: R (r)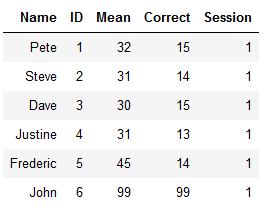
Again, there might be other tasks that we need to carry out. For instance, we can also create dummy variables in R.
Reading Many Excel Files in R
In this section of the R read Excel tutorial, we will learn how to load many files into an R dataframe.
For example, in some cases, we may have many Excel files containing data from different experiments or experimental sessions. In the following example, we will work with read_excel, again, together with the lapply function.

However, this time, we have a character vector with the file names and then use the paste0 function to paste the subfolder where the files are.
xlsx_files <- c("example_concat.xlsx",
"example_concat1.xlsx",
"example_concat3.xlsx")
dataframes <- lapply(xlsx_files, function(x)
read_excel(path = paste0("simData/", x)))Code language: R (r)Finally, we use the do.call function, again, to bind the dataframes together into one. Note, if we want, we can also use the bind_cols function from the r-package dplyr (part of tidyverse).
df <- do.call("rbind", dataframes)

tail(df)Code language: R (r)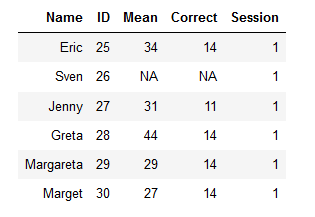
Here is how we use the bind_rows function:
dplyr::bind_rows(dataframes)Code language: R (r)Reading all Files in a Directory in R
This section will teach us how to read all xlsx files in a directory. Knowing this may come in handy if we store every xlsx file in a folder and do not want to create a character vector, like above, by hand. In the next example, we will use R’s Sys.glob function to get a character vector of all Excel files.
xlsx_files <- Sys.glob('./simData/*.xlsx')Code language: R (r)
After we have a character vector with all the file names that we want to import to R, we just use lapply and do.call (see previous code chunks).
Setting the Data type for data or columns
We can also set the data type for the columns if we like. Let us use R to reread the example_sheets1.xlsx. In the Pandas read_excel example below, we use the col_type parameter to set the data type of some of the columns.
df <- read_excel('SimData/example_sheets2.xlsx',
                 col_types=c("text", "text", "numeric",
                            "numeric", "text"),
                   sheet='Session1')

str(df)Code language: R (r)
Importing Excel Files in RStudio
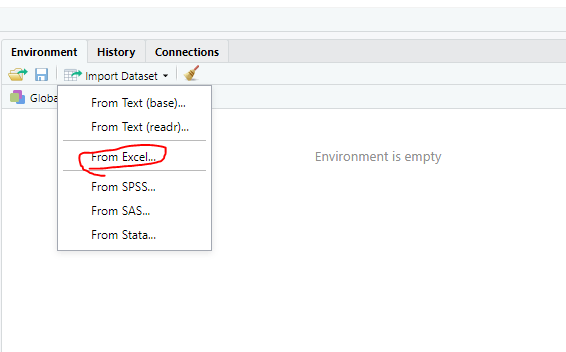
Before we continue this Excel in R tutorial, we will learn how to load xlsx files to R using RStudio. This is quite simple: open up RStudio, click on the Environment tab (right in the IDE), and then Import Dataset. In this section, we will answer the question of how to import an Excel file into RStudio.
Now, we will get a drop-down menu, and we can choose from different types of sources. As we are going to work with Excel files, we choose “From Excel…”:
In the next step, we klick “Browse” and go to the folder where our Excel data is located.
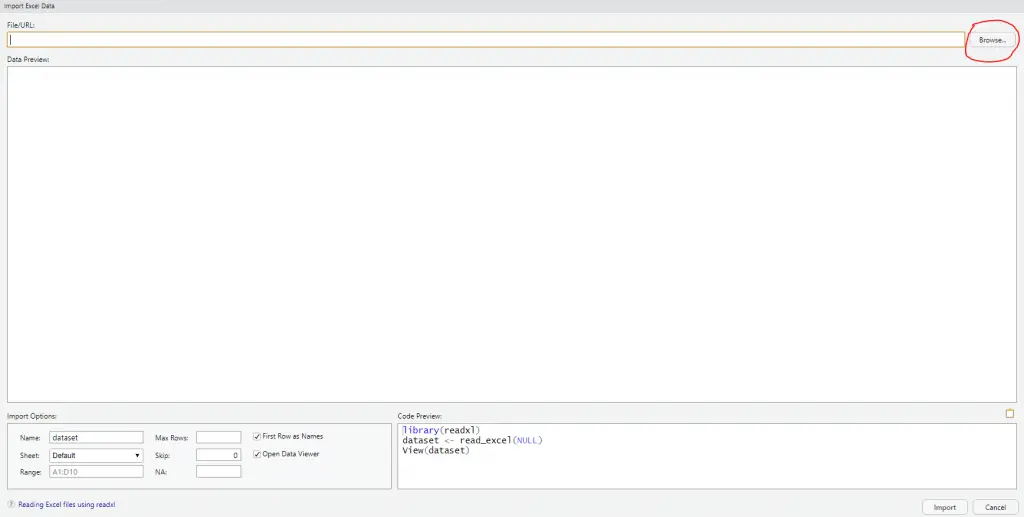
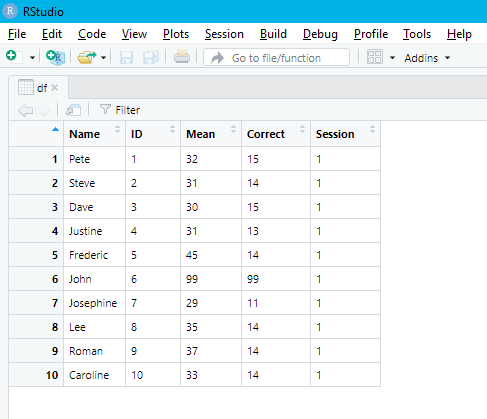
Now we get some alternatives. For instance, we can change the name of the dataframe to “df”, if we want (see image below). Furthermore, before we import the Excel file in RStudio, we can specify how the missing values are coded and the rows to skip.
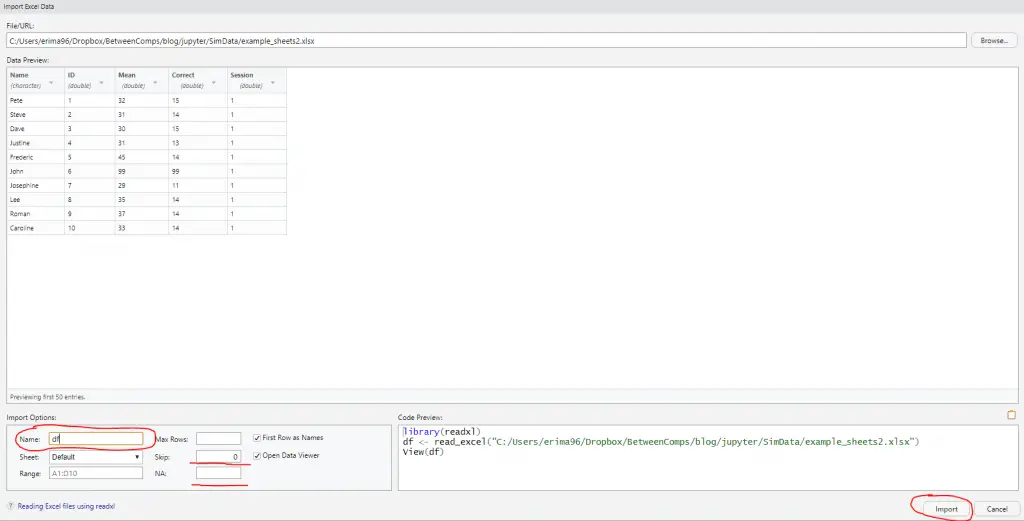
Finally, when we have everything set up as we want it, we can hit the Import button in RStudio to read the data file.
Writing R Dataframes to Excel
Excel files can, of course, be created in R. In this section, we will learn how to write an Excel file using R. For now, we have to use the r-package xlsx to write .xlsx files. More specifically, to write to an Excel file, we will use the write.xlsx function:

We will start by creating a dataframe with some variables.
df <- data.frame("Age" = c(21, 22, 20, 19, 18, 23), "Names" = c("Andreas", "George", "Steve",
                           "Sarah", "Joanna", "Hanna"))


str(df)Code language: R (r)
Now that we have a dataframe to write to xlsx, we start using the write.xlsx function from the xlsx package.
library(xlsx)
write.xlsx(df, 'names_ages.xlsx',
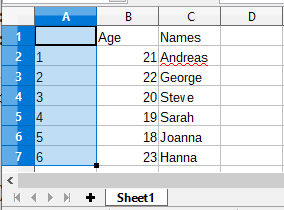
sheetName = "Sheet1"Code language: R (r)The output below shows the effect of not using any parameters. If we don’t use the parameter sheetName, we get the default sheet name, ‘Sheet1’.
As noted in the image below, the Excel file has column (‘A’) containing numbers. These are the index from the dataframe.
In the next example, we will give the sheet another name and set the row.names parameter to FALSE.
write.xlsx(df, 'names_ages.xlsx',
           sheetName = "Names and Ages",
          row.names=FALSE)Code language: R (r)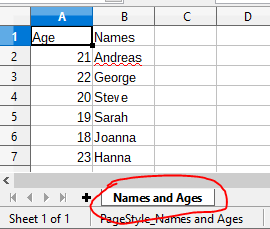
As can be seen in the image above, we get a new sheet name, and the indexes are not a column in the Excel sheet. Note that if you get the error ‘could not find function “write.xlsx,’ it may be that you did not load the xlsx library.
Writing Multiple r Dataframes to an Excel File:
In this section, we will learn how to write multiple dataframes to one Excel file. More specifically, we will use R and the xlsx package to write many dataframes to multiple sheets in an Excel file.
First, we create three dataframes and add them to a list.
df1 <-data.frame('Names' = c('Andreas', 'George', 'Steve',
'Sarah', 'Joanna', 'Hanna'),
'Age' = c(21, 22, 20, 19, 18, 23))
df2 <- data.frame('Names' = c('Pete', 'Jordan', 'Gustaf',
'Sophie', 'Sally', 'Simone'),
'Age' = c(22, 21, 19, 19, 29, 21))
df3 <- data.frame('Names' = c('Ulrich', 'Donald', 'Jon',
'Jessica', 'Elisabeth', 'Diana'),
'Age' = c(21, 21, 20, 19, 19, 22))
dfs <- list(df1, df2, df3)Code language: R (r)Next, we are going to create a workbook using the createWorkbook function.
wb <- createWorkbook(type="xlsx")Code language: R (r)Finally, we will write a custom function that we will use together with the lapply function, later. In the code chunk below,
add_dataframes <- function(i){

    df = dfs[i]
    sheet_name = paste0("Sheet", i)
    sheet = createSheet(wb, sheet_name)

    addDataFrame(df, sheet=sheet, row.names=FALSE)
}Code language: R (r)
It’s time to use the lapply function with our custom R function. On the second row, in the code chunk below, we are writing the workbook to an xlsx file using the saveWorkbook function:
lapply(seq_along(dfs), function(x) multiple_dataframe(x))saveWorkbook(wb, 'multiple_Sheets.xlsx')Code language: R (r)Summary: How to Work With Excel Files in R
In this working with Excel in R tutorial, we have learned how to:
- Read Excel files and Spreadsheets using read_excel and read.xlsx
- Load Excel files to dataframes:
- Import Excel sheets and skip rows
- Merging many sheets to a dataframe
- Reading many Excel files into one dataframe
- Load Excel files to dataframes:
- Write a dataframe to an Excel file
- Creating many dataframes and writing them to an Excel file with many sheets
Resources
- Sum Across Columns in R – dplyr & base
- R: Add a Column to Dataframe Based on Other Columns with dplyr
- Z Test in R: A Tutorial on One Sample & Two Sample Z Tests
- How to Standardize Data in R
- Binning in R: Create Bins of Continuous Variables
- How to Check if a File is Empty in R: Practical Examples